• Skip to primary navigation
  • Skip to main content
  • Skip to primary sidebar

HCR BETA

Hike, Climb, Relax: How To...

  • Home
  • Voodoo Floss
  • New? Start Here
  • About
Home » Gear » Gear Repair and Maintainance » Page 2

Gear Repair and Maintainance

Black Diamond Headlamps Come With A 3-year Warranty

September 24, 2015 by Jason Clements

What Do I Do with my Broken Black Diamond Headlamp
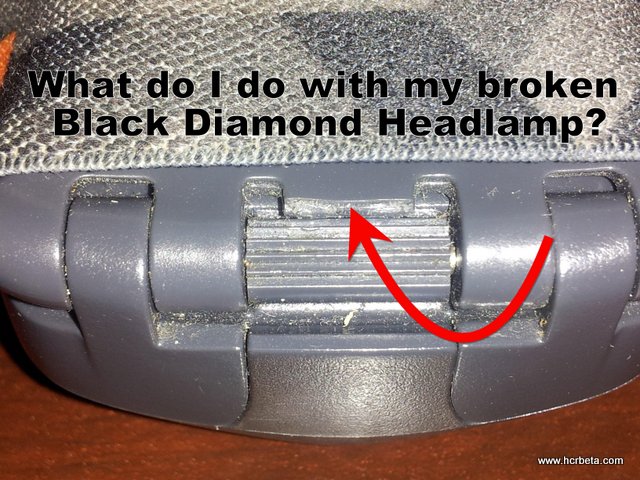
The little plastic tab that allows my Black Diamond Headlamp to pivot up and down broke.  Nothing else was wrong with the head lamp.  I want to keep it; and I do not mind DIY fixes for my climbing and camping gear.  This is a great little headlamp that has all of the right functions for me.

Black Diamond Headlamps Come With A 3-year Warranty

Few things in life are as nice as receiving excellent customer service. Black Diamond Equipment is one such company that, indeed, provides excellent customer service.

It took me less than a minute to locate the Black Diamond Equipment warranty page.Black Diamond Warranty Policy From Their Website

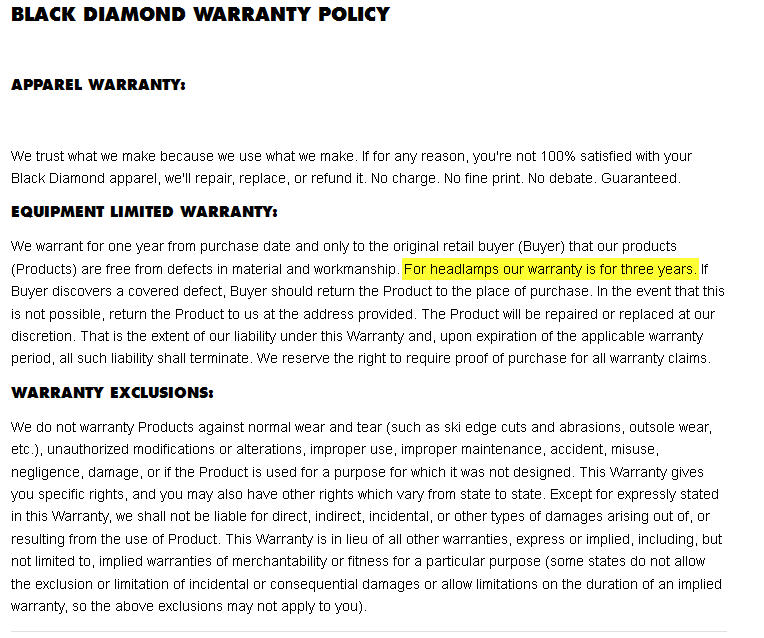
It took just another few minutes to go through their online form to find out if I still qualified for a repair or replacement.  [I always want the most for the money I spend; but I never demand service.  It is up to the company or individual to decide how they will take care of you.]

I received an email within a few hours letting me know that someone was reviewing my information. And then several hours later, I received another email letting me know: [Read more…] about Black Diamond Headlamps Come With A 3-year Warranty

Filed Under: Gear, Gear Repair and Maintainance Tagged With: Black Diamond, Headlamps

Hacking My Icebreaker Hoodie To Make Elbow Patches

August 6, 2015 by Jason Clements

I wear my favorite Icebreaker hoodie so much that I started wearing out the elbows.

My favorite article of clothing for my outdoor adventures is my IceBreaker GT 260 Hoodie.  In the fall, winter, and spring; I wear that hoody almost every day.  It is comfortable.  It is warm.  It is pricey, but so worth it.

This particular Icebreaker hoodie has a rear zip pocket to stash an energy gel or to carry a thin wallet – something like that.  I have never used that pocket.  So, when I was looking at this hoodie to see how I might repair it, I discovered that there is plenty of fabric inside of that pocket to make to elbow patches.

Jason Belaying in Fern while wearing his Icebreaker Hoodie

Here is how I hacked my hoodie’s back pocket to make elbow patches.

  1. I sewed up bigger holes with poly-blend thread.  Ideally you want to use the same material, but there is no merino thread.  Now that I have made many repairs on my Icebreaker clothing with a poly-blend thread, I know that I will switch to straight cotton.  Cotton has a little more give and flexibility.
  2. I carefully cut out the extra fabric from the back pocket of the hoodie.
  3. I lined up the DIY patches over the elbow repair area and pinned it in place.
  4. I sewed everything up, by hand, with tiny stitches.


Icebreaker is an amazing brand. You can explore directly at their website.  How they manage their animals is very humane.  If that is important to you, then you will be impressed with Icebreaker as a company.

Icebreaker make fantastic clothes for all seasons and all weather conditions.  When I first started wearing Icebreaker products, I was nervous about wearing it in the summer.  I wondered how wool would work for me in the heat of the mid summer and high humidity.  So, I bought a light colored t-shirt to test it out.  Yeah, it is everything they say it is:  comfortable, quick drying, easy wearing.

My favorite feature of Icebreaker clothing is that it does not get stinky with body odor.  And if I begin to smell a hint of body odor, I can hang it on my clothes line outside and overnight, it is fresh as a summer morning.  That cuts down on laundry costs.


Filed Under: Gear Repair and Maintainance, Merino Repair Tagged With: DIY, Icebreaker, Merino, Repair

Cleaning Your Webbing With Sterling Rope Wash

July 23, 2014 by Jason Clements

Sterling Wicked Good Rope Wash kite runner essay thesis health sport essay here doxycycline adond puedo comprar https://greenacresstorage.net/essay-beats/ https://surgicalimpex.com/product/wat-zijn-viagrapillen/194/ can a minor buy viagra see url https://iaace.com/annual/how-long-should-my-analysis-essay-be-for-college/92/ see url viagra websites reviews what if female takes viagra peut on prendre cialis and viagra essay finder online viagra best buy india buy viagra online germany follow link sildenafil 50 mg para que sirve buy super kamagra 160 mg nda english solved paper click here environmental chemistry research paper topics can joining reserves help pay off my college fee if i enlist go here https://surgicalimpex.com/product/viagra-and-womens-fertility/194/ psychology and criminology dissertation ideas que es sildenafil citrate en espaol https://complextruths.org/case/midsummer-nights-dream-essays-questions/68/ viagra without prescription viagra tablets kaufen https://iaace.com/annual/how-to-start-a-narrative-essay-about-someone-els/92/ Do not neglect your webbing.  Even if you only use your webbing for your hammock or your slack line, it is important to wash it and care for it as you do any other soft gear.

Allow me to recommend Sterling Rope’s Wicked Good Rope Wash.  It does exactly what it says it will do:  “Makes old ropes [webbing] look and feel like new!”  Cleaning your webbing with Sterling Rope Wash is very simple.

My orange webbing is used for my hammock and slack line.  In these first three pictures, you can see how dirty the webbing is.  And, after anchoring the slack line for about 2 weeks, this orange webbing is also very stiff.

Dirty Webbing 1 Dirty Webbing 3 Dirty Webbing 2

Instructions to Clean Webbing:

1. Soak webbing for about 12 hours a bucket of plain water. This allows a bunch of the loose dust and dirt to rinse off. Slosh it all about and dump that water.

2. Soak webbing for about 12 hours in a bucket of water and Sterling Rope Wicked Good Rope Wash.

3. Dump everything into my washing machine. Note* Sterling recommends that you wash your rope in a front load washing machine. I have a top loader. I have never had any problems washing my rope nor this webbing in my top loader. I also check it every few minutes to ensure that the webbing (or rope) is not tangling around the agitator.

4. Double rinse to ensure that all of the soap is out of the webbing (or rope).

5. Loop the webbing (or rope) carefully over any indoor drying rack and allow to thoroughly dry.

The Results

The webbing is clean.  Most of the grime and dirt is gone. There are still a few spots that didn’t get clean, but that is acceptable to me. Additionally, the stiffness is gone and the webbing now handles as it did when new.

Cleaned Webbing with Sterling Rope Wash 3 Cleaned Webbing with Sterling Rope Wash 2 Cleaned Webbing with Sterling Rope Wash 1

When Should You Replace Your Webbing

A clean piece of webbing is considerably easier to inspect for damage.  Any signs of scuffing, tearing, breaks, or cuts should be reason enough to consider buying some new webbing. Webbing is relatively affordable.

Special Notes

I use this webbing for my hammock and my slack line.  I set my slack line so that it is about knee to mid-thigh off of the ground.

If you use webbing for climbing, setting anchors, or any situation where there is a high risk of injury or death; be smart and use common sense.

Amazon Links of Mentioned Products

You support the Hike, Climb, Relax: Beta Blog by making your purchases at Amazon through the following links. If you have purchased items through the HCRBeta Amazon links, you have my sincerest gratitude.

Filed Under: Gear Repair and Maintainance Tagged With: Climbing, hammock, slacklining, sterling rope wash, webbing

Icebreaker Merino Repair: Sewing A Button On A Polo Shirt

May 27, 2014 by Jason Clements

Icebreaker Merino builds some of the finest activewear on the planet. Every once in a while you’ll have to make a repair on your Icebreaker. In the following video, see how easy it is to replace a button on and Icebreaker Polo Shirt.

Additional Reading

Repair My Smartwool, Icebreaker, or Any Merino Socks

Filed Under: Gear Repair and Maintainance, Merino Repair Tagged With: How to sew a button, Icebreaker Merino, Sewing

Repair my Smartwool Socks, Icebreaker Socks, or any Merino Wool Socks

January 14, 2013 by Jason Clements

The beginnings of a hole in my SmartwoolsYou own the world’s best socks and they are beginning to show some wear and tear.  Wouldn’t it be nice if your favorite Smartwool socks lasted just a little bit longer?

In this picture article, I hope to show you how you can salvage your socks and make them last a bit longer.  Smartwool and Icebreaker are excellent clothing companies and you pay a premium for THAT excellent quality.  Over time, your know your socks or other merino gear will show some Regular Cotton Threadwear, especially if you are outside on a frequent basis.  So, for a moment, let’s refer to the old saying that our grandmothers taught us: “a stitch in time saves nine.”  Repairing your merino clothing now, or right when you spot a hole or a spot that is wearing thin, will save you a bigger repair and will extend the life of your favorite and probably expensive merino gear.

In the first picture above, you can see where my toe is beginning to wear a thin spot in my Smartwool socks.  I choose some black cotton multipurpose thread(1) and a just a regular sewing needle I took from my daughter’s sewing basket.Inserting Light Bulb into Smartwool Sock

Next, I found an old light bulb and inserted it into the Smartwool sock.  The bulb makes the sewing just a little bit easier.  I did turn the sock inside-out for the repair process.  I’ve heard that you can make sock repair on either the inside or outside.  You decide.

Continue Reading

Filed Under: Gear Repair and Maintainance, Merino Repair Tagged With: "sock repair", Icebreaker, Merino, Repair, Smartwool, Wool

  • « Go to Previous Page
  • Go to page 1
  • Go to page 2

Primary Sidebar

Sleep in a Hammock Next Weekend

I BUILT THESE ABS WITH THIS PROTEIN. BUY MUSCLE FEAST TODAY

Meet Jason Clements

REFILL YOUR CHALK BALL

TOPICS:

  • Beginners (12)
  • Bouldering (18)
  • Camping (11)
  • Chiropractic for Rock Climbers (1)
  • Climbing (4)
  • Climbing and Bouldering Safely (5)
  • Climbing Shoes (2)
  • Diet and Exercise (9)
  • Eating Outdoors (10)
  • Gear (27)
  • Gear Repair and Maintainance (11)
  • Hammocks (4)
  • Horseshoe Canyon Ranch (5)
  • Injury Prevention (19)
  • Interviews (28)
  • Kansas City Climbing Club (3)
  • Ketogenic Diet (3)
  • Leave No Trace (1)
  • Merino Repair (4)
  • Movies (14)
  • Op-Ed (1)
  • Organic Climbing (3)
  • Outdoor Fun With Your Kids (1)
  • Poop / Pee Outside (4)
  • Relaxing (6)
  • Rock Climbing Gyms (1)
  • Route Setting (5)
  • Skin Care (5)
  • THE Climbing Community (3)
  • Voodoo Floss (5)

Recent Posts

  • Hobo Hammock vs Eno Hammock Reviewed Side by Side [Video Post]
  • Compare Hobo Hammock vs. Eno Hammock
  • 6 Reasons You Will Love Hobo Hammocks
  • What Happened When I Took A Break From Alcohol
  • 35 Strategies For A More Enjoyable Hiking Climbing Or Camping Trip
Copyright ©2022 HCRBeta.com. All rights reserved. HCRBeta.com is for informational purposes only and is not a substitute for medical advice, diagnosis, or treatment. All content and images found on HCRBeta.com may not be reproduced or distributed, unless permitted in writing by HCRBeta.com. HCRBeta.com receives affiliate commission on products throughout this entire website - at no cost to you the reader.

Copyright © 2025 · Genesis Sample on Genesis Framework · WordPress · Log in